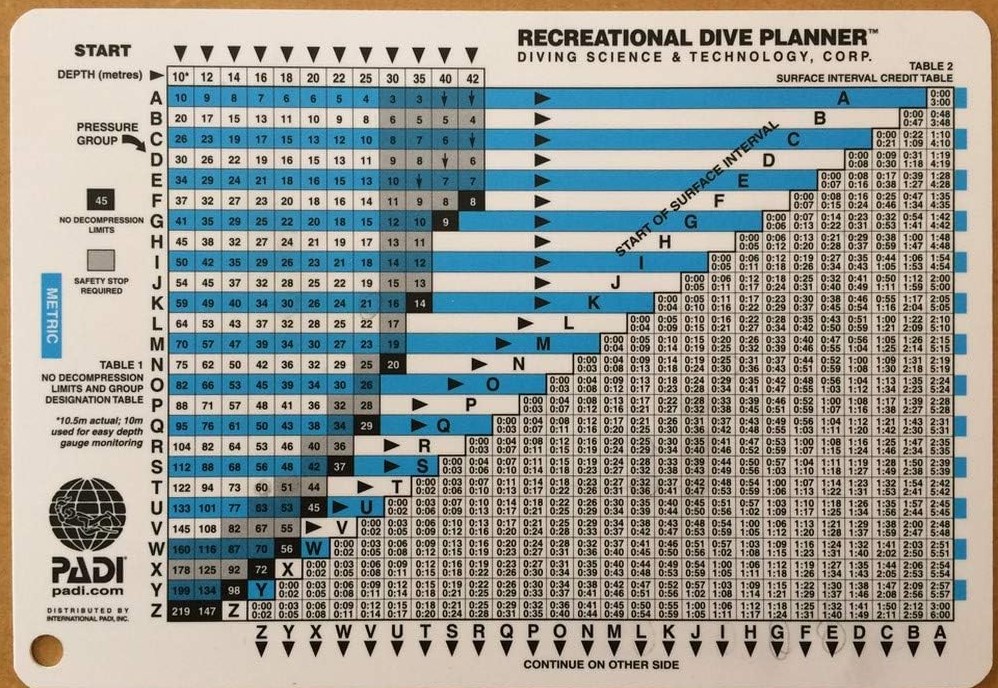
The Recreational Dive Planner (RDP) was developed by the Professional Association of Diving Instructors (PADI) in the late 1980s. It revolutionized recreational diving by providing a simpler way for divers to calculate safe dive times and surface intervals.

Background and Development
Before the RDP, divers primarily used the U.S. Navy Dive Tables, developed in the 1950s and 1960s. These tables were designed for military and commercial divers, who typically undertook more demanding dives than recreational divers. However, the Navy tables could be overly conservative for recreational diving, limiting dive times and requiring longer surface intervals.

In response, PADI collaborated with Dr. Raymond Rogers and researchers from DSAT (Diving Science and Technology) to develop dive tables specifically tailored to recreational diving profiles. Through extensive research and testing, they created the RDP with time limits optimized for typical recreational depths and dive times.
Key Features of the RDP

- User-Friendly Layout: The RDP features a straightforward layout with four main sections (depth, time, surface interval, and pressure group) that make it easier for divers to plan safe multi-dive profiles.
- No-Decompression Limits (NDL): The RDP’s main innovation is setting dive times that avoid decompression stops, making it safer and simpler for recreational divers.
- Surface Interval Credit: The RDP also includes a surface interval table to help divers account for residual nitrogen between dives.

RDP Evolution: From Tables to Digital Tools
The original RDP came as a plastic table but has since evolved into multiple formats:
- Table Format: Still commonly used for training and backup, especially for divers learning to calculate no-decompression limits.
- Wheel Format: A circular version of the RDP, offering more precision and flexibility for planning repetitive dives.
- Digital Dive Computers: Modern dive computers often use algorithms based on the RDP and other models, automatically calculating nitrogen absorption and eliminating the need for manual table use.
Today, while many divers rely on computers, the RDP remains an essential learning tool in dive courses, helping new divers understand fundamental dive planning and the importance of safe nitrogen management.
Understanding the RDP Table: A Guide for New Divers
The Recreational Dive Planner (RDP) is an essential tool for managing safe dive times and depths. This guide walks you through the basics of the RDP table, which has four main sections: Depth, Time, Surface Interval, and Pressure Group.
1. Depth
As an Open Water diver, your maximum depth is 18 meters. The depth row helps you track your safe limits based on how deep you plan to dive.
2. Time
The RDP shows how much time you can safely spend at a particular depth. For example, at 18 meters, your dive time will vary depending on how much nitrogen your body has already absorbed.
3. Surface Interval
After each dive, you need a surface interval to release nitrogen. The table guides how much surface time is required to reduce nitrogen levels before your next dive.
4. Pressure Group
Pressure groups are designated by letters, indicating the nitrogen level in your body after a dive. Tracking your pressure group after each dive is key, as nitrogen can build up over multiple dives. For instance, after a dive to 18 meters for 30 minutes, your pressure group might be “K.” A 45-minute surface interval might reduce this to “E.”
Example Dive Scenario
Suppose you dive to 18 meters for 30 minutes, reaching pressure group “K.” After a 45-minute surface interval, you’re at pressure group “E.” If you dive to 18 meters again, the RDP indicates residual nitrogen (18 minutes) and maximum allowable time (38 minutes), resulting in a total dive time of 56 minutes. Adding this 18 minutes of residual nitrogen to a planned 30-minute dive puts you in pressure group “S.”
By following these steps, you can safely plan your dives, especially when doing multiple dives in a single day. Keep the RDP handy to keep track of your nitrogen levels and dive safely.
More Scuba Diving Abbreviations you must include in your Vocab Library
- No Decompression Limit (NDL) – This is the maximum allowable dive time to a specific depth.
- Residual Nitrogen – This is the more than normal amount of nitrogen left in your tissues after a dive.
- Pressure Group (PG) – A letter that represents that amount of residual nitrogen in your body after a dive.
- Surface Interval – This is the amount of time that you spend on the surface between one dive and the next.
- Residual Nitrogen Time (RNT) – The amount of residual nitrogen in your body, expressed in minutes, you have remaining in your body prior to entering the water for a repetitive dive.
- Adjusted No Decompression Limit (ANDL) – The maximum amount of time you can spend at a specified depth on a repetitive dive.
- Dive Profile – A graphical representation of a dive.
- Actual Bottom Time (ABT) – The time you have spent on the dive.
- Total Bottom Time (TBT) – The sum of the RNT and the ABT, used after a repetitive dive to calculate the pressure group.
Now that you have all that cleared out, let me introduce you to the Dive Profile Chart. As mentioned the Dive Profile is the graphical representation of a dive which should look like this.

Feel free to click on the photo to download the pdf version of the photo above. Save it, save it on your cloud storage or phone, use it and Use it a lot. Cannot reiterate more than that. Debates re this can counter the purpose of my making a post about this, because yes. I believe in conservative diving and so sole dependency on dive computers is not something I teach.
How to use RDP for Planning Your Dive and making a Dive Profile for safe diving
Using the Recreational Dive Planner (RDP) and recording each step on your Dive Profile chart are essential practices for safe and enjoyable diving, particularly on multi-dive days. The RDP helps you manage nitrogen exposure by setting safe time limits based on your dive depth and surface intervals. This tool allows divers to keep track of no-decompression limits (NDLs), which indicate how long you can stay underwater without needing a decompression stop.
By charting your dives, you gain a clear, documented dive profile that includes depths, bottom times, surface intervals, and your pressure group after each dive. This record helps you monitor nitrogen absorption, especially if planning consecutive dives. Charting also provides a quick reference for your next dive’s residual nitrogen level, ensuring your next dive falls within safe limits. This process not only reduces the risk of decompression sickness but also ensures you’re maximizing your bottom time safely, allowing you to enjoy the underwater environment without unnecessary risk.
Dive details:
First Dive at Twin Rocks: 18 Meters Depth
If you’re diving to Twin Rocks and plan to go to a depth of 18 meters, locate the depth on the top row of Table One of your RDP. At the bottom of the 18-meter column, you’ll see the number 76 in a black box. This is your No Decompression Limit (NDL), meaning you can stay at 18 meters for up to 76 minutes without requiring a decompression stop.
Note: In your Advanced Open Water course, you’ll learn more about diving beyond no-stop limits, but for now, stick to the NDL.
Planning for a Second Dive a shore entry at the house reef of about 13 meters deep.
If you want to do a second dive, you’ll need to consider the residual nitrogen in your body, which is shown by pressure groups. Let’s continue with an example:
First Dive Details:
- Depth: 18 meters
- Bottom Time: 30 minutes (a conservative time for new divers getting used to diving)
- Locate 18 Meters and Bottom Time in Table One
For 18 meters, follow down to find the nearest time higher than 30 minutes, which is 32 minutes. Trace this row to the right, and you’ll find Pressure Group L. This pressure group reflects the residual nitrogen in your body after your first dive. - Surface Interval
Next, head to Table Two, which shows your Surface Interval Time (SIT) . Let’s assume you’ll take a 1-hour surface interval, a common duration during our dive tours. Starting from Pressure Group L, move across the row until you reach 1 hour (shown after 51 minutes). Follow this column down to find your new pressure group after the surface interval, which is Pressure Group C. This group indicates the residual nitrogen in your body after resting for an hour. - Second Dive Plan
For your second dive, flip to Table Three to determine how long you can dive with this residual nitrogen.
- Suppose your second dive is at 13 meters (e.g., at The Barge dive site found directly in front of the dive shop). If your exact depth isn’t listed, go with the next higher depth, 14 meters.
- Follow this row to the right under Pressure Group C. Here, you’ll find two numbers in the box: 19 (Residual Nitrogen Time, RNT) and 79 (Adjusted No Decompression Limit).
- This adjusted NDL (79 minutes) means you can safely stay underwater at 13 meters for up to 79 minutes without a decompression stop.
Planning a Third Dive (Optional)
For those planning a third dive, you’ll need to consider both your actual bottom time and residual nitrogen time from the previous dive.
Total Bottom Time Calculation
Let’s say you spent 40 minutes on your second dive, enjoying some turtle sightings. Add this to your Residual Nitrogen Time (19 minutes) for a Total Bottom Time (TBT) of 59 minutes.
- Use the R.A.T. Method:
- R = Residual Nitrogen Time
- A = Actual Bottom Time
- T = Total Bottom Time
Locate Your New Pressure Group for Dive Three
Head back to Table One to start planning your third dive.
- Find 14 meters (or the nearest depth) and look for 59 minutes. Since 59 isn’t listed, go with the next higher time, 61 minutes.
- This places you in Pressure Group Q for your third dive.
Repeat if Necessary
If you’re planning additional dives, follow the same steps, using Table Two for your surface interval credit and calculating your new pressure group for each dive.
By using the RDP tables carefully, you can track nitrogen levels throughout your day, ensuring safe, enjoyable dives. Dive safely, and enjoy exploring Anilao’s incredible underwater landscapes!

